
오전일과(index, ajax1이론, ajax2 실습, ajax3 실습)
index

index
화면 구현인데 다 잘 따라갔는데 article 영역에
표에 정보 입력은 못따라갔다.. 집가서 해볼 예정.
강사님 스크립트는 없는데 한번 만지막 해보고 내일 질문 예정
<!DOCTYPE html>
<html lang="en">
<head>
    <meta charset="UTF-8">
    <meta http-equiv="X-UA-Compatible" content="IE=edge">
    <meta name="viewport" content="width=
    , initial-scale=1.0">
    <title>main</title>
    <style>/* 처음에 간단히 style을 여기 적어도됨 */
        .containe {
            width : 100%
        }

        header {
            /* 헤더로 스타일을 만들때는 앞에 점도 안찍음 */
            background-color: #cccccc;
            color : #ffffff;
            text-align: center;
            padding : 20px; /* 패딩 위옆아래 */

        }
        footer {
            background-color: antiquewhite;
            text-align: center;
            padding: 10px;
        }

        section {
            width: 100%;
            height: 700px;
            display: grid;
            grid-template-areas: 'nav article article article article';
            /* 그리드 사용, 가장 이해가 쉬운 그리드 템프레이트 에어리어 */
            /* nav와 article의 비율을 조절하기 위해서는 nav article article article 같이 기입 */
        }
        /* 아래는 section 영역 안에 있는 것들 (grid) */
        nav {
            grid-area: nav;
            background-color: aquamarine;
            padding: 20px;
            border: 1px solid #6b9371;
        }

        article {
            grid-area: article;
            background-color: cadetblue;
        }

        nav > ul { /* nav 밑에 있는 ul태그를 찾아서 바꿔라 */
            list-style-type: none;
            /* nav영역 안 ul안에 점을 지워줌 */
        }
    </style>
</head>
<body>
    <div class="container">
        <!-- div style boarder:1px solid #cccccc 위와같은 말-->
        <header>
            <!-- 헷갈리기때문에 헤드는 헤더로 작성하는게 좋음 -->
            <h3>head 영역</h3>
        </header>
        <section>
            <nav>
                <p>nav영역</p>
                <ul>
                    <li><a href="index.html">메인</a></li>
                    <li><a href="login.html">로그인</a></li>
                    <li><a href="join.html">회원가입</a></li>
                </ul>
            </nav>
            <article>
                <p>아티클 영역</p>
                <table border="1">
                    <thead>
                        <tr>
                            <th>번호</th>
                            <th>아이디</th>
                            <th>이름</th>
                            <th>연락처</th>
                            <th>이메일</th>
                        </tr>
                    </thead>
                    <tbody id = "tbody">
                    </tbody>

                </table>
            </article>
        </section>
        <footer>
            <h4>footer 영역</h4>
        </footer>


    </div>
    <script>

        const tbody = document.getElementById('tbody')

        const memberlist =[
            {code:'1', user_id:'아이디1', name:'이름1', phone:'010-0000-0001', mail:'a@a.com'},
            {code:'2', user_id:'아이디1', name:'이름1', phone:'010-0000-0002', mail:'a@a.com'},
            {code:'3', user_id:'아이디1', name:'이름1', phone:'010-0000-0003', mail:'a@a.com'}
        ];


        //memberlist의 배열 개수 만큼 반복하면서 tmp로 복사
        for(let tmp of memberlist){
            tbody.innerHTML +=
                `<tr>` +
                    `<td>${tmp.code}</td>` +
                    `<td>${tmp.user_id}</td>` +
                    `<td>${tmp.name}</td>` +
                    `<td>${tmp.phone}</td>` +
                    `<td>${tmp.mail}</td>`
                `</tr>`;
        }

    </script>
</body>
</html>
위는 본인이 만든 코드 but 지금은 작동하지 않음.. 집에서 해볼 예정
지금보니 중간에 강사님 코드로 갈아타서 생략된 부분이 많음.
아래는 강사님
<!DOCTYPE html>
<html lang="en">
<head>
    <meta charset="UTF-8">
    <meta http-equiv="X-UA-Compatible" content="IE=edge">
    <meta name="viewport" content="width=device-width, initial-scale=1.0">
    <title>메인</title>
    <link href="./css/style2.css" rel="stylesheet" />

</head>

<body>
    <div class="container">
        <header>
            <h3>header 영역</h3>
        </header>

        <section>
            <nav>
                <p>nav 영역</p>
                <ul>
                    <li><a href="index.html">메인</a></li>
                    <li><a href="login.html">로그인</a></li>
                    <li><a href="join.html">회원가입</a></li>
                    <li><a href="ajax1.html">ajax1실습</a></li>
                    <li><a href="ajax2.html">ajax2실습</a></li>
                    <li><a href="ajax3.html">ajax3실습</a></li>
                    <li><a href="ajax4.html">ajax4실습</a></li>


                </ul>
            </nav>
            <article>
                <p>article 영역</p>
                <table border="1">
                    <thead>
                        <tr>
                            <th>번호</th>
                            <th>아이디</th>
                            <th>이름</th>
                            <th>연락처</th>
                            <th>이메일</th>
                        </tr>
                    </thead>
                    <tbody>
                        <tr>
                            <td>1</td>
                            <td>아이디</td>
                            <td>이름</td>
                            <td>연락처</td>
                            <td>이메일</td>
                        </tr>

                    </tbody>
                </table>

            </article>
        </section>

        <footer>
            <h4>footer 영역</h4>
        </footer>
    </div>
</body>
</html>
강사님 코드를 받아오고 끝까지 쓰고 있는 코드.
계속 내가 수정해서 쓰는 중
내용 정리
grid를 이용하여 뼈대있는 홈페이지를 만듬
아래는 그리드 참고자료
https://studiomeal.com/archives/533
이번에야말로 CSS Grid를 익혀보자
이 포스트에는 실제 코드가 적용된 부분들이 있으므로, 해당 기능을 잘 지원하는 최신 웹 브라우저로 보시는게 좋습니다. (대충 인터넷 익스플로러로만 안보면 된다는 이야기) 이 튜토리얼은 “
studiomeal.com
그리고 html안에서 style을 작업하다가 css로 옮겨주는 작업까지 해봤음.(해당 파일은 style2)
grid-template-areas 간단한 입력방법
grid-template-areas: 'nav article article article article';grid 부분은 한번 싸악 봐주고 기록이 많을수록 좋을듯
그리드 뼈대만들기 아래 참고
https://developer.mozilla.org/ko/docs/Web/CSS/border-collapse
border-collapse - CSS: Cascading Style Sheets | MDN
border-collapse CSS 속성은 표 테두리(border)가 분리(separated) 또는 상쇄(collapsed)될 지를 결정합니다. 분리 모델에서는, 인접한 셀은 각각 자신의 고유(distinct) 테두리가 있습니다. 상쇄 모델에서는, 인
developer.mozilla.org
border-collapse 이론
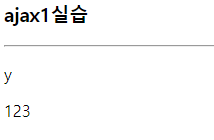
ajax1 이론
<!DOCTYPE html>
<html lang="en">
<head>
    <meta charset="UTF-8">
    <meta http-equiv="X-UA-Compatible" content="IE=edge">
    <meta name="viewport" content="width=device-width, initial-scale=1.0">
    <title>Document</title>
    <link href="./css/style2.css" rel="stylesheet" />
</head>
<body>
    <div class="container">
        <h3>ajax1실습</h3>
        <hr />
        <div id="output"></div>
    </div>

    <script>
        const name = 'aaa';
        // name = 'ddd';
        // 위처럼 const를 사용했을때 name ='ddd'; 는 사용하지 못함 but 아래는
        // 가져온 데이터를 변경하지 않는 것.
        // 보통 대개 이것을 주로 활용해야함
        // name을 보관하고 싶다는 뜻

        // let name1 = 'bbb';
        // var name2 = 'ccc';
        // name1 ='eee';
        // name2 ='ccc';
        // 위처럼 let var는 바꿔짐
        // 가공할 것이면 let과 var를 사용 ex) '2012-12-03 15:00:30.000'
        // but 이것은 백엔드가 '2012-12-03'로 데이터를 주는 것이 마땅
        // 프론트에서는 데이터 가공이 많이 되면 좋지 않음.
        // 위 세개 다 보관 하는 것임.

        //백엔드로 요청하는 과정 (요청만 받기는x)
        const xhr = new XMLHttpRequest();
        //백엔드에서 데이터를 받는 것
        const ur1 = 'http://1.234.5.158:23000/json/exam1.json';
        //백엔드의 서버 위치
        xhr.open('GET', ur1);
        xhr.send();

        //콜백(완료되는지) 만들기, 백엔드로 전송된 데이터가 완료되는 시점
        xhr.addEventListener('load', function(e){
            // console.log(xhr.response);
            // const b = xhr.response;
            // console.log(b.ret);// y출력
            // console.log(b.data);// 123출력


            // const a = {ret: "y", data:"123"};
            // // {"ret": "y", "data": "123"} exam1의 형태와 위 const랑 똑같은 말
            // console.log(a.ret); // y출력
            // console.log(a.data); // 123출력

            // Json.parse(데이터) string =>objext
            // Json.stringify(데이터) object => string
            const b = JSON.parse(xhr.response); // 받은 것
            console.log(typeof b); // 오브젝트가 아니면 문제이므로 위 제이슨을 활용하여 변경
            console.log(b, b.ret, b.data);
            //위가 최종 본
            //이 구간 보기 힘든듯

            // const a = {ret: "y", data:"123"}; // 임의로
            // console.log(a);
            // console.log(typeof a); // 오브젝트로옴
            // // console.log(typeof b); // string으로 옴

            const output = document.getElementById("output");
            output.innerHTML =
            //innerHTML +=? 차이 궁금
                `<p>${b.ret}</p>` +
                `<p>${b.data}</p>` ;

        });

    </script>
</body>
</html>
const , let , var 의 개념을 배움
const는 선언하면 절대로 바뀌지 않음.
let, var는 다시 선언하면 바뀜.
xhr로 백엔드와 소통하는 법 배움
//백엔드로 요청하는 과정 (요청만 받기는x)
        const xhr = new XMLHttpRequest();
        //백엔드에서 데이터를 받는 것
        const ur1 = 'http://1.234.5.158:23000/json/exam1.json';
        //백엔드의 서버 위치
        xhr.open('GET', ur1);
        xhr.send();
백엔드에 데이터 요청
url에 서버 위치 입력
xhr.open
xhr.send
???? 모르겠노 위 두줄이 의미하는것은?
//콜백(완료되는지) 만들기, 백엔드로 전송된 데이터가 완료되는 시점
        xhr.addEventListener('load', function(e){
        // Json.parse(데이터) string =>objext
        // Json.stringify(데이터) object => string
        const b = JSON.parse(xhr.response); // 받은 것
        console.log(typeof b); // 오브젝트가 아니면 문제이므로 위 제이슨을 활용하여 변경
        console.log(b, b.ret, b.data);
        const output = document.getElementById("output");
        output.innerHTML =
            `<p>${b.ret}</p>` +
            `<p>${b.data}</p>` ;
const b = JSON.parse(xhr.response)
위 명령어로 받아서 output 테이블에 p태그로 표기
ajax2 실습

<!DOCTYPE html>
<html lang="en">
<head>
    <meta charset="UTF-8">
    <meta http-equiv="X-UA-Compatible" content="IE=edge">
    <meta name="viewport" content="width=device-width, initial-scale=1.0">
    <title>Document</title>
</head>
<body>
    <div class="container">
        <h3>ajax 실습2</h3>
        <hr />
        <table border="1">
            <thead>
                <tr>
                    <th>ret</th>
                    <th>data</th>
                </tr>
            </thead>
            <tbody id="tbody">

            </tbody>
        </table>
    </div>
    <script>
        const xhr = new XMLHttpRequest();
        const url = 'http://1.234.5.158:23000/json/exam2.json';
        xhr.open('GET', url);
        xhr.send();

        xhr.addEventListener('load', function(e){
            const response = JSON.parse(xhr.response);
            console.log(response); // [{…}, {…}]

            const tbody = document.getElementById('tbody');


            for(let tmp of response){ // 2번 회전
                console.log(tmp);
                tbody.innerHTML +=
                `<tr>`+
                    `<td>${tmp.ret}</td>`+
                    `<td>${tmp.data}</td>`+
                `<tr>`;

            }
        });
    </script>
</body>
</html>
테이블 만들고 데이터 서버에서 받아와서 테이블에 기입 반복학습
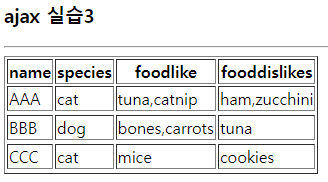
ajax3 실습
<!DOCTYPE html>
<html lang="en">
<head>
    <meta charset="UTF-8">
    <meta http-equiv="X-UA-Compatible" content="IE=edge">
    <meta name="viewport" content="width=device-width, initial-scale=1.0">
    <title>ajax3</title>
</head>
<body>
    <div class="container">
        <h3>ajax 실습3</h3>
        <hr />
        <table border="1">
            <thead>
                <tr>
                    <th>name</th>
                    <th>species</th>
                    <th>foodlike</th>
                    <th>fooddislikes</th>
                </tr>
            </thead>
            <tbody id="tbody">

            </tbody>
        </table>
    </div>
    <script>
        const xhr = new XMLHttpRequest();
        const url = 'http://1.234.5.158:23000/json/exam5.json';
        xhr.open('GET', url);
        xhr.send();

        xhr.addEventListener('load', function(e){
            const response = JSON.parse(xhr.response);
            console.log(response); // [{…}, {…}]

            const tbody = document.getElementById('tbody');


            for(let tmp of response){
                console.log(tmp);
                tbody.innerHTML +=
                `<tr>`+
                    `<td>${tmp.name}</td>`+
                    `<td>${tmp.species}</td>`+
                    `<td>${tmp.foods.likes}</td>`+
                    `<td>${tmp.foods.dislikes}</td>`+
                `<tr>`;

            }
        });
    </script>
</body>
</html>
조금 더 심화된 내용
ajax4

<!DOCTYPE html>
<html lang="en">
<head>
    <meta charset="UTF-8">
    <meta http-equiv="X-UA-Compatible" content="IE=edge">
    <meta name="viewport" content="width=device-width, initial-scale=1.0">
    <title>ajax3</title>
</head>
<body>
    <div class="container">
        <h3>ajax 실습4</h3>
        <hr />
        <table border="1">
            <thead>
                <tr>
                    <th>아이디</th>
                    <th>이름</th>
                    <th>나이</th>
                    <th>국어</th>
                    <th>영어</th>
                    <th>수학</th>
                    <th>합계</th>
                    <th>평균</th>
                </tr>
            </thead>
            <tbody id="tbody">

            </tbody>
        </table>
    </div>
    <script>
        const xhr = new XMLHttpRequest();
        const url = 'http://1.234.5.158:23000/json/exam10.json';
        xhr.open('GET', url);
        xhr.send();

        xhr.addEventListener('load', function(e){
            const response = JSON.parse(xhr.response);
            console.log(response); // [{…}, {…}]

            const tbody = document.getElementById('tbody');

            for(let tmp of response.data){
                //리스폰스에서 {
                // "ret":"y"
                // "data": [---]
                //}
                //위와 같이 데이터를 받아올때 data에 있는 데이터만 가져와야
                //리스폰스 오류가 없어짐.
                //[]부터 시작하는 것만 response는 받아올 수 있음.
                tbody.innerHTML +=
                `<tr>`+
                    `<td>${tmp.id}</td>`+ //아이디
                    `<td>${tmp.name}</td>`+ //이름
                    `<td>${tmp.age}</td>`+ //나이
                    `<td>${tmp.score.kor}</td>`+ //국어
                    `<td>${tmp.score.eng}</td>`+ //영어
                    `<td>${tmp.score.math}</td>`+ //수학
                    `<td>${tmp.score.kor + tmp.score.eng + tmp.score.math}</td>`+ //합계
                    `<td>${Math.ceil((tmp.score.kor + tmp.score.eng + tmp.score.math)/3)}</td>`+ //평균
                `<tr>`;

            }
        });
    </script>
</body>
</html>
오브젝트를 더 어렵게 내주심.
[]괄호 중요
계속 오류나길래 계속 찾다보니 response 오타였다 ㅡㅋㅋ 개빠ㄱ침
오전 정리
데이터를 받아와서 테이블에 첨가 실습 백엔드에서 받아오는 것처럼 연습
새로운 홈페이지 만들기
index.html style html에서 작성후 css로 따로 저장
table에 입력할때 조금 까다로운 data를 받아와서 기입함
response할때 .???을 붙여 데이터를 받아와야 오류가 안뜸
response는 대괄호 []부터 데이터를 받아옴
백엔드와 소통할때는 오브젝트로 주고받음
Json.parse(데이터) string =>objext
Json.stringify(데이터) object => string
오후일과
게시판 심화

<!DOCTYPE html>
<html lang="en">
<head>
    <meta charset="UTF-8">
    <meta http-equiv="X-UA-Compatible" content="IE=edge">
    <meta name="viewport" content="width=device-width, initial-scale=1.0">
    <title>게시판</title>
    <link href="./css/bootstrap.min.css" rel="stylesheet" />

</head>
<body>
    <div class="container" style="margin-top: 20px; border:1px solid #cccccc">
        <div style="margin-top: 20px;">
            <h3>게시판</h3>
            <hr />
        </div>

        <a href="boardwrite.html" class="btn btn-success">글쓰기</a>
        <!--아래는 bootrap에서 class를 땡겨온 것임-->
        <!--페이지 이동 태그는 a태그(href)-->

        <table class="table table-hover">
        <!--부트스트랩에서 테이블에 양식클래스를 끌어옴-->
        <!--목록을 보여줄때는 테이블을 많이 쓴다.-->
            <thead>
            <!--헤드는 행-->
                <tr>
                    <th>글번호</th>
                    <th>제목</th>
                    <th>작성자</th>
                    <th>조회수</th>
                    <th>날짜</th>
                </tr>
            </thead>
            <tbody id = "tbody">
            </tbody>

        </table>
    </div>

    <script>
        const xhr = new XMLHttpRequest();
        const ur1= "http://1.234.5.158:23000/board/selectlist.json?page=1";
        xhr.open('GET', ur1);
        xhr.send();

        xhr.addEventListener('load', function(e){
            const response = JSON.parse(xhr.response);
            const tbody = document.getElementById('tbody');
            console.log(response); // [{…}, {…}]

            if(response.status === 200){
                for(let tmp of response.result){
                    tbody.innerHTML +=
                    `<tr>`+
                        `<td>${tmp.no}</td>`+
                        `<td><a href="boardone.html?no=${tmp.no}">${tmp.title}</a></td>`+
                        //위에는 제목을 누르면 a태그로 이동하게끔함
                        //?no=${tmp.no}">${tmp.title}를 붙이면 어디 페이지에서 이동해왔는지 말게됨
                        //a태그 위에는 전달하고자하는 정보
                        `<td>${tmp.writer}</td>`+
                        `<td>${tmp.hit}</td>`+
                        `<td>${tmp.regdate}</td>`+
                    `<tr>`;
                }
            }
            else{
                alert('서버오류')
            }


        });


    </script>
</body>
</html>
서버에서 불러오는 게시판을 만들었고,
테이블에 이쁘게 붙여놓음
제목을 누르면 a태그로 이동하고 어디에서 이동해 왔는지 no(게시물 번호)로 이동
a태그 위에는 전달하고자하는 정보
글쓰기로 서버에 업로드하기

<!DOCTYPE html>
<html lang="en">
<head>
    <meta charset="UTF-8">
    <meta http-equiv="X-UA-Compatible" content="IE=edge">
    <meta name="viewport" content="width=device-width, initial-scale=1.0">
    <title>글쓰기</title>
    <link href="./css/style1.css" rel="stylesheet" />
    <link href="./css/quill.snow.css" rel="stylesheet" />


</head>

<body>
    <div class="container">
        <h3>글쓰기</h3>
        <hr />

        <div>
            <label class="lbl">제목</label>
            <input type="text" id="title"/>
        </div>

        <div>
            <label class="lbl">내용</label>
            <div id="editor"></div>
        </div>

        <div>
            <label class="lbl">작성자</label>
            <input type="text" id="writer"/>
        </div>

        <div>
            <label class="lbl">이미지</label>
            <input type="file" />
        </div>

        <div>
            <label class="lbl"></label>
            <input type="button" value="등록" onclick="sendData()"/>
            <!-- 바로 실행하게끔 온클릭 아래 펀크션 활용, 클릭은하면 아래 펀크션을 쓰세용-->
        </div>

    </div>

    <!--먼저 보이는 것들 html, css는 꾸며놓은 것, js는 움직이는 것-->
    <!--스크립트는 헤드에 안넣고 마지막에다가 넣음-->
    <script src="./js/axios.min.js"></script>
    <script src="./js/quill.js"></script><!--textaraea, script는 축약형이 안된다.-->
    <script>
        var quill = new Quill('#editor', {
            theme:'snow'
        });


        function sendData(){


            const obj = {
                title : document.getElementById('title').value,
                content : quill.root.innerHTML,
                writer : document.getElementById('writer').value
            }
                //const obj = {title:'a', content:'b'm writer:'c'}
                //이모양으로 전송되어짐
            console.log(obj);

            // const title = document.getElementById('title');
            // const content = quill.root.innerHTML;
            // const writer = document.getElementById('writer');
            // //alert('click event')
            //위 const obj와 이 주석의 뜻은 같음 obj으로 쓰는 연습

            const url = 'http://1.234.5.158:23000/board/insert.json';
            axios.post(url, obj).then(function(response){
                console.log(response);
                if(response.data.status === 200){
                    alert('글쓰기 성공');
                    window.location.href='board.html';
                }
            }); // 위 몇줄이 아래에 긴 것들을 줄인 것임.

            // // console.log(title.value, content, writer.value);
            // const xhr = new XMLHttpRequest();
            // xhr.open('POST', url); // POST
            // //메소드(method)
            // //GET <= 데이터를 조회할때. 게시판 목록
            // //POST<= 추가할때 씀. 게시판 글쓰기
            // //PUT <= 변경 게시판 수정
            // //DELETE<= 삭제 게시판 삭제
            // xhr.send(JSON.stringify(obj));
            // //JSON.parse = string -> obj
            // //JSON.stringify = obj -> string 이것임

            // xhr.addEventListener('load', function(e){
            //     const response = JSON.parse(xhr.response);
            //     console.log(response);

            // });
        }

    </script>
</body>
</html>
axios를 이용하여 xhr부분의 스크립트를 많이 줄여쓰게 됨.
게시물 확인

<!DOCTYPE html>
<html lang="en">
<head>
    <meta charset="UTF-8">
    <meta http-equiv="X-UA-Compatible" content="IE=edge">
    <meta name="viewport" content="width=device-width, initial-scale=1.0">
    <title>Document</title>
    <link href="./css/style1.css" rel="stylesheet" />
</head>
<body>
    <div class="container">
        <h3>게시판 내용</h3>
        <hr />

        <p id="no">여기는 글번호</p>
        <p id="title">여기는 제목</p>
        <p id="content">여기는 내용</p>
        <p id="writer">여기는 작성자</p>
        <p id="hit">여기는 조회수</p>
        <p id="regdate">여기는 날짜</p>
    </div>

    <script src="./js/axios.min.js"></script>
    <script>
        //아래
        console.log(window.location);
        //서버에대한 정보를 다 가지고 있음.


        // 127.0.0.1:5500/boardone.html?no=207    => 207가져오기
        const href = new URL(window.location);
        const urlParam = href.searchParams;

        //반복문으로 바꿔보기---------------------------------------------------
        // eee = [no, title, content, writer, hit, regdate];

        // for(let tmp of eee);
        //     const tmp = urlParam.get(tmp);
        //     console.log(tmp);

        const no = urlParam.get("no");
        console.log(no);

        const title = urlParam.get("title");
        console.log(title);

        const content = urlParam.get("content");
        console.log(content);

        const writer = urlParam.get("writer");
        console.log(writer);

        const hit = urlParam.get("hit");
        console.log(hit);

        const regdate = urlParam.get("regdate");
        console.log(regdate);

        //----------------------------------------------------

        // 백엔드에서 내용을 받아서 p태그에 표시하기

        const url = `http://1.234.5.158:23000/board/selectone.json?no=${no}`;
        // 백엔드에서 113번 게시물을 가져오기전

        axios.get(url).then(function(response){
            console.log(response);
            console.log(response.data.result);
            const obj = response.data.result;

            //반복문으로 바꿔보기---------------------------------------------------
            const no = document.getElementById("no");
            no.innerHTML = obj.no;

            const title = document.getElementById("title");
            title.innerHTML = obj.title;

            const content = document.getElementById("content");
            content.innerHTML = obj.content;

            const writer = document.getElementById("writer");
            writer.innerHTML = obj.writer;

            const hit = document.getElementById("hit");
            hit.innerHTML = obj.hit;

            const regdate = document.getElementById("regdate");
            regdate.innerHTML = obj.regdate;

            //-------------------------------------------------------------
        });

    </script>
</body>
</html>
게시물 내용 확인하는 것을 배움
서버로부터 제목, 내용 , 번호, 작성자를 받아와서 표기
for문으로 간추려서 해야하는데 아직 능력이 되지 않음.
글쓰기에서 서버에 업로드
axios를 이용하여 xhr부분의 스크립트를 많이 줄여쓰게 됨.
강사님 서버 주소
http://1.234.5.158:23000/json/exam1.json
코드 비교
https://www.diffchecker.com/diff
Diffchecker
Try our desktop app Offline diffing, advanced features and more
www.diffchecker.com
ps. 깃허브에 백업해놓고 오지 않아서 파일이 없어서 어찌 못하는중 나머지 정리는 내일 해야할듯...
'html' 카테고리의 다른 글
| 국비 코딩 풀스택 수업 5일차 (0) | 2022.06.27 |
|---|---|
| 국비 코딩 수강전 준비 (0) | 2022.06.24 |
| 국비 코딩 풀스택 수업 4일차 (0) | 2022.06.24 |
| 국비 코딩 풀스택 수업 2일차 (0) | 2022.06.22 |
| 국비 코딩 풀스택 수업 1일차 (0) | 2022.06.21 |