국비 코딩 풀스택 수업 15일차
요약정리
오전
백엔드 코드 작성
(exp_20220711>models>boardmodel.js)ㄴ
(exp_20220711>routes>board.js)
현재 시간 생성, 이미지, 파일 첨부 (모듈 설치 포함)
원하지 않는 데이터 제외하고 나머지 호출하는 방법
게시물 호출시 이미지도 같이 호출하기
return res.send({status:200, result:result, image:'/board/image?no='+no});
const 상수로 변경 불가능(하위는 가능)
var 어디서든지 사용가능(범위가 더 넓음)
let는 {}안에 만들면 안에서만 사용가능 (구역)
오후
집에서 할때 깃헙에서 내려 받고 node설치 방법(npm install)
꾸미지 않고 기본적인 요소만 입력
BoardSelect.vue 게시판(백엔드에서 작성한 text(검색어 포함된 글 찾기) 매우 중요, )
BoardInsert.vue 글쓰기
BoardContent.vue(실습)
오전일과
boardmodel.js
board.js(get 3, post 1)
exp > cmd > npm start
서버실행
exp_20220711 > models > boardmodel.js 보드 만들기
기본사항 적기(파일 포함)
// npm i mongoose --save
var mongoose = require('mongoose');

// 자동 번호 설정용, 시퀀스
// npm i mongoose-sequence --save
const AutoIncrement = require('mongoose-sequence')(mongoose);

var Schema = mongoose.Schema;
var boardSchema =  new Schema({
    _id : Number, // 기본키, 고유값, not null 비어있으면 안됨
    title   : {type:String, default:''},
    content : {type:String, default:''},
    writer  : {type:String, default:''},
    hit     : {type:Number, default:1}, //조횟수, 숫자 기본값1
    regdate : {type:String, default:''},
    filedata : {type:Buffer, default:null}, //파일데이터
    filesize : {type:Number, default:0}, //파일 크기
    filename : {type:String, default:''}, //파일 이름
    filetype : {type:String, default:''}, //파일의 종류 jpg,png등
});

// 스키마 항목중에서 시퀀스 필요한 것 설정
boardSchema.plugin(AutoIncrement,
    {id:"SEQ_BOARD_NO", inc_field:'_id'});

//몽고db에 board컬렉션 생성됨.
module.exports = mongoose.model('boards', boardSchema);
bookmodel에서 양식을 끌어옴.
바뀐점은 중간은 싹 바꼇고 위는 그대로 하단부분은 조금 바뀜
exp_20220711 > routes > board.js 만들어만 놓기
-- 현재 시간 생성(cmd경로는 exp_20220711임)
CMD> npm i moment --save
CMD> npm i moment-timezone --save
-- 이미지 첨부
CMD> npm i multer --save
xxxxxxxxxxxxxxxxxxxxxxxxxxxxxxx
파일 업로드시 db에서 파일명이 깨져서 옛버전으로 설치
npm i multer@1.4.4
모듈 설치까지 해줌
-----------------------------------------
exp_20220711 > app.js에 board 추가
var boardRouter = require('./routes/board');

app.use('/board', boardRouter);
------------------------------------------
board.js 작성
multer
upload
moment
var express = require('express');
var router = express.Router();

// npm i multer --save
const multer = require('multer')

// 첨부되어 오는 파일을 저장하는 방식 ex)파일로 저장, 메모리로 저장
// 여기서는 데이터 베이스에 저장해야하기 때문에 메모리로 저장
const upload = multer({storage : multer.memoryStorage()});

// npm i moment
// npm i moment-timezone --save
require('moment-timezone');
var moment = require('moment');
moment.tz.setDefault('Asia/Seoul'); // 표준시 UTC 시간, 아시아.서울로 설정

//db연동을 위한 모델 ORM
var Board = require('../models/boardmodel');
기본 사항 + 이미지에 관련된 upload + 시간 moment 넣어줌
post 제목, 내용, 작성자, 파일 업로드
포스트맨으로 post해보고
console.log(req.body); //db cmd보고 body로 전달 되는 것을 확인함
console.log(req.file); //마찬가지 flile로 오는 것을 확인함

// 크롬에서 127.0.0.1:3000/board/insert.json
//{"title":"aaa", "content":"bbb", "wirter":"ccc", "flile":첨부파일}
//파일 넣을꺼면 upload.sing("") 넣어줘야함
router.post('/insert.json', upload.single("file"), async function(req, res, next) {
    try{
        console.log(req.body); //db cmd보고 body로 전달 되는 것을 확인함
        console.log(req.file); //마찬가지 flile로 오는 것을 확인함

        var obj = new Board(); // 빈 객체를 생성
        obj.title = req.body.title;
        obj.content = req.body.content;
        obj.writer = req.body.writer;
        obj.regdate = moment().format('YYYY-MM-DD HH:mm:ss');

        obj.filedata = req.file.buffer;
        obj.filename = req.file.originalname;
        obj.filetype = req.file.mimetype;
        obj.filesize = req.file.size;

        const result = await obj.save();
        if(result !== null){
            return res.send({status:200})
        }
        return res.send({status:0})

    }
    catch(e){
        console.error(e);
        return res.send({status:-1, result:e});
    }
});
받아 온 것들을 각각 만든 obj에 넣어줌.
get select 토탈(total), 페이지 개수(page)
// 127.0.0.1:3000/board/select.json?page=5&text=a
router.get('/select.json', async function(req, res, next) {
    try{
        const page =Number(req.query.page); //5
        const text = req.query.text; //a

        //1페이지이면 점프 10개
        //2페이지이면 점프 20개

        const query = {title: new RegExp(text,'i')};
        const projection = {_id:1, title:1, writer:1, hit:1, regdate:1}
        const sort = {_id:-1}; //오름차수는 1 내림은 -1
        const result = await Board.find(query,projection)
        .sort(sort).skip((page-1)*10).limit(10); // 조건이 들어와야함, 가져올 항목 중요

        const total = await Board.countDocuments(query);
        if(result !== null){
            return res.send({status:200, result:result, total:total});
        }
        return res.send({status:0})

    }
    catch(e){
        console.error(e);
        return res.send({status:-1, result:e});
    }
});
위는 글 찾기 하면서 수정된 코드임.
원래는 const query = {};
        const query = {title: new RegExp(text,'i')};
        const projection = {_id:1, title:1, writer:1, hit:1, regdate:1}
        const sort = {_id:-1}; //오름차수는 1 내림은 -1
        const result = await Board.find(query,projection)
        .sort(sort).skip((page-1)*10).limit(10); // 조건이 들어와야함, 가져올 항목 중요
//가져올 데이터 항목 따로 관리(길어지면 힘들기 때문)
const sort = {_id:-1}; //오름차수는 1 내림은 -1
const result = await Board.find(query,projection).sort(sort);
// find안에 조건이 들어와야함, 가져올 항목 여기서는 query 쿼리, projection 프로젝션 중요중요중요중요(projection)
토탈 내보내기
const total = await Board.countDocuments(query);
if(result !== null){
    return res.send({status:200, result:result, total:total});
}
return res.send({status:0})
페이지네이션(query 쿼리 이용)
// 127.0.0.1:3000/board/select.json?page=5&text=a
router.get('/select.json', async function(req, res, next) {
    try{
        const page =Number(req.query.page); //5
        const text = req.query.text; //a
글찾기 (검색 글자 포함 글들 찾기, 포함 문구)
const query = {title:text};
이렇게하면 딱 그것만 찾아짐

const query = {title: new RegExp(text,'i')};
이렇게하면 찾을려는 텍스트를 포함한 게시글이 찾아짐
11개 게시글일떄 10개의 게시물 표시
1페이지이면 점프 0개
2페이지이면 점프 10개
const result = await Board.find(query,projection).sort(sort).skip((page-1)*10).limit(10);
페이지 1개 뺴고 10 곱하면 됨.
selectone만들기 상세화면
// 127.0.0.1:3000/board/selectone.json?no=5
router.get('/selectone.json', async function(req, res, next) {
    try{
        const no =Number(req.query.no); //5

        const query = {_id:no};
        const projection = {filedata:0, filesize:0, filetype:0, filename:0};


        const result = await Board.find(query).select(projection)

        if(result !== null){
            return res.send({status:200, result:result, image:'/board/image?no='+no});
        }
        return res.send({status:0})

    }
    catch(e){
        console.error(e);
        return res.send({status:-1, result:e});
    }
});
select에서 뺄거 다 뺌
const projection = {filedata:0, filesize:0, filetype:0, filename:0};
위 4개 항목을 제외하고 데이터를 호출
원하지 않는 데이터 제외하고 나머지 호출하는 방법
get image 만듬(이미지 따로 불러내기) selectone과 다르게 findOne사용!!!!!!!!
//127.0.0.1:3000/board/image?no=4
//<img src="/board/image?no=4" style"width:50px" /> 뷰에서는 이렇게 쓸 예정
router.get('/image', async function(req, res, next) {
    try{
        const no = Number(req.query.no);
        const query = {_id:no};
        const projection = { filedata:1, filesize:1, filetype:1, filename:1};
        const result = await Board.findOne(query).select(projection);

        console.log(result);
        res.contentType(result.filetype); // contentType변경
        return res.send(result.filedata); // 파일데이터
    }
    catch(e){
        console.error(e);
        return res.send({status:-1, result:e});
    }
});
const projection = {filedata:1, filesize:1, filetype:1, filename:1};
const result = await Board.findOne(query).select(projection);
get selectone 부분에 result에 image:'/board/image?no='+no 를 포함시킴
게시물을 가져올때, 이미지도 해당 넘버의 이미지도 같이 호출하려고
return res.send({status:200, result:result, image:'/board/image?no='+no});오후 일과
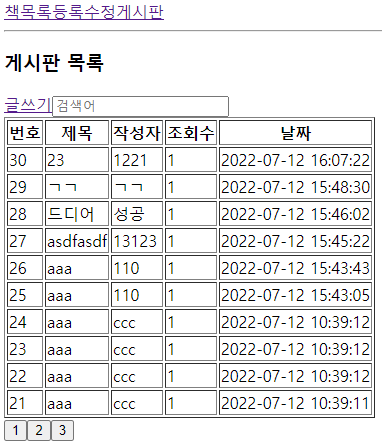
vue_20220711>BoardSelect.vue
<template>
    <div>
        <h3>게시판 목록</h3>
        <router-link :to="{path:'/boardinsert'}">글쓰기</router-link>

        <input type="text" placeholder="검색어" v-model="state.text" @keyup.enter="handleText()"/>
        <table border="1">
            <tr>
                <th>번호</th>
                <th>제목</th>
                <th>작성자</th>
                <th>조회수</th>
                <th>날짜</th>
            </tr>
            <tr v-for="tmp of state.rows" :key="tmp._id">
                <td>{{tmp._id}}</td>
                <td @click="handleContent(tmp._id)" style="cursor:pointer">{{tmp.title}}</td>
                <td>{{tmp.writer}}</td>
                <td>{{tmp.hit}}</td>
                <td>{{tmp.regdate}}</td>
            </tr>
        </table>
        <div v-for="tmp of state.pages" :key="tmp"
            style="display:inline-block">
            <button v-text="tmp" @click="handlePage(tmp)"></button>
        </div>
    </div>
</template>

<script>
import { reactive } from '@vue/reactivity'
import { onMounted } from '@vue/runtime-core';
import axios from 'axios';
import { useRouter } from 'vue-router';
export default {
    setup () {
        const router = useRouter();

        const state = reactive({
            page : 1,
            text : '',
            rows : [],
            total : 0,
            pages : 0,
        });

        const handleData = async() =>{
            const url = `/board/select.json?page=${state.page}&text=${state.text}`;
            const headers = {"Content-Type" : "application/json"};
            const {data} = await axios.get(url, {headers});
            console.log(data);
            if(data.status === 200){
                state.rows = data.result; //게시물 내용
                state.total = data.total; //게시물 개수
                //21 => (21-1)/10 + 1
                state.pages = Math.floor((data.total-1)/10)+1;
            }
        };

        const handlePage = (tmp) =>{
            state.page = tmp;
            handleData();
        }

        const handleText = () =>{
            state.page = 1;
            handleData();
        };

        const handleContent = async(no) => {
            console.log('handleContent', no);
            const url = `/board/selectone.json?no=${no}`;
            const headers = {"Content-Type":"application/json"};

            const {data} = await axios.get(url, {headers});

            console.log(data);
            if(data.status ===200){
                router.push({path:'/boardcontent', query:{sendno : no}});
            }
        };
        onMounted(()=> {
            handleData();
        });

        return {state, handlePage, handleText, handleContent}
    }
}
</script>

<style lang="scss" scoped>

</style>
라우트 등록
vue.config.js작성
      '/board': {
        target : 'http://127.0.0.1:3000',
        changeOrigin : true,
        logLevel : 'debug'
      }
코드 작성
기초 테이블
<table border="1">
    <tr>
        <th>번호</th>
        <th>제목</th>
        <th>작성자</th>
        <th>조회수</th>
        <th>날짜</th>
    </tr>
    <tr v-for="tmp of state.rows" :key="tmp._id">
        <td>{{tmp._id}}</td>
        <td @click="handleContent(tmp._id)" style="cursor:pointer">{{tmp.title}}</td>
        <td>{{tmp.writer}}</td>
        <td>{{tmp.hit}}</td>
        <td>{{tmp.regdate}}</td>
    </tr>
</table>
기초 페이지네이션
<div v-for="tmp of state.pages" :key="tmp"
    style="display:inline-block">
    <button v-text="tmp" @click="handlePage(tmp)"></button>
</div>
키업엔터(검색어 텍스트 글 찾기) 아주 중요.
백엔드에서 코드 만든 것을 통해 원하는 글자가 포함된 글자를 가져옴exp_20220712>routes>board.js
const text = req.query.text; //a
const query = {title: new RegExp(text,'i')};
vue_20220712>src>components>BoardSelect.vue
<input type="text" placeholder="검색어" v-model="state.text" @keyup.enter="handleText()"/
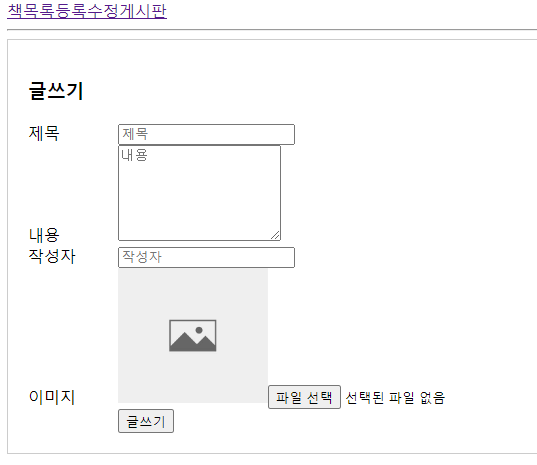
BoardInsert만들기 (간단한 글쓰기 양식 만들기)
<template>
    <div class="container">
        <h3>글쓰기</h3>

        <div>
            <label class="lbl">제목</label>
            <input type="text" placeholder="제목" v-model="state.title" />
        </div>

        <div>
            <label class="lbl">내용</label>
            <textarea rows="6" placeholder="내용" v-model="state.content"></textarea>
        </div>

        <div>
            <label class="lbl">작성자</label>
            <input type="text" placeholder="작성자" v-model="state.writer"/>
        </div>

        <div>
            <label class="lbl">이미지</label>
            <img :src="state.img" style="width:150px"/>
            <input type="file" @change="handleImage($event)"/>
        </div>

        <div>
            <label class="lbl"></label>
            <button @click="handleInsert">글쓰기</button>
        </div>
    </div>
</template>

<script>
import { reactive } from '@vue/reactivity';
import axios from 'axios';
import { useRouter } from 'vue-router';
export default {
    setup () {
        const router = useRouter();

        const state = reactive({
            img      : require('../assets/imgs/noimage.png'),
            title     : '',
            content  : '',
            writer    : '',
            file     : null,
        });

        const handleImage = (e) => {

            console.log(e.target.files[0]);
            console.log(e.target.files.length);
            if(e.target.files.length > 0) {
                state.file = e.target.files[0];
                state.img  = URL.createObjectURL( e.target.files[0] );
            }

            else{
                state.file = '';
                state.img = require('../assets/imgs/noimage.png');
            }
        };


        const handleInsert = async() => {
            //유효성 검사

            const url = `/board/insert.json`;
            const headers = {"Content-Type" : "multipart/form-data"};

            //이미지가 있는 경우 body 정보 담기
            let body = new FormData();
            body.append("title", state.title);
            body.append("content", state.content);
            body.append("writer", state.writer);
            body.append("file", state.file);

            const {data} = await axios.post(url, body, {headers});
            console.log({data});
            if(data.status === 200){
                alert('게시물 등록')
                router.push({path:'/boardselect'});
            }
        }

        return {state, handleInsert, handleImage}
    }
}
</script>


<style lang="css" scoped>
    .container {
        width: 600px;
        border: 1px solid #cccccc;
        padding:20px;
    }
    .lbl {
        display: inline-block;
        width: 90px;
    }
</style>
특이사항:
가장 기본적인 모양의 글쓰기 양식
라벨, 인풋에 몰아 넣기(type, placeholder, v-model)
handleImage로 이미지 입력시 입력한 이미지로 출력
취소시 폴더의 noimage로 출력
글쓰기 handleInsert (사진이라 multipart/form-data 사용, body 사용, append 할때 양식)
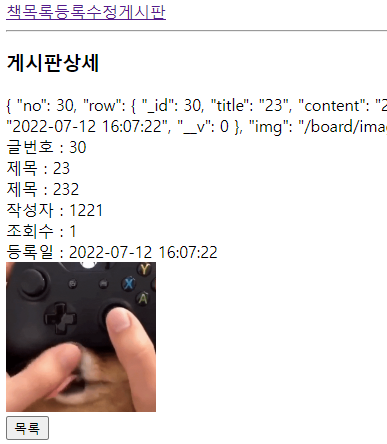
BoardContent만들기 실습(내가 직접 만듬 다음시간에 해주실지 모르겠음.)
<template>
    <div>
        <h3>게시판상세</h3>
        {{ state }} <!-- 처음에 해놓는게 좋음 -->
        <div v-if="state.row">
            글번호 : {{state.row._id}} <br/>
            제목 : {{state.row.title}} <br/>
            제목 : {{state.row.content}} <br/>
            작성자 : {{state.row.writer}} <br/>
            조회수 : {{state.row.hit}} <br/>
            등록일 : {{state.row.regdate}} <br/>
            <img :src="state.img" style="width:150px"/> <br/>
            <router-link to ="/boardselect">
                <button>목록</button>
            </router-link>
        </div>
    </div>
</template>

<script>
import { reactive } from '@vue/reactivity'
import { useRoute, useRouter } from 'vue-router'
import { onMounted } from '@vue/runtime-core';
import axios from 'axios';
export default {
    setup () {
        const route = useRoute(); //query값 받기
        const router = useRouter(); //페이지 이동 import 필수
        console.log(route);

        const state = reactive({ // 초기선언
            no : Number(route.query.sendno), // 목록에서 전달되는 글번호
            row : null, // 게시글 내용 1개
            img : '',
        });

        const handleData = async() => {
            const url = `board/selectone.json?no=${state.no}`
            const headers = {"Content-Type":"application/json"};
            const {data} = await axios.get(url, {headers});
            console.log(data);
            if(data.status === 200){
                state.row = data.result[0];
                state.img = data.image;
                console.log(data.image);
            }
        }
        onMounted( () => {
            handleData();
        });

        const handleUpadte = async() =>{
            // 컴포넌트 없음
            // BoardUpdatepage.vue 생성
            // 라우트 연결
            router.push({path:'/boardu', query :{sendno: state.no} });
        }
        return {state, handleUpadte}
    }
}
</script>

<style lang="scss" scoped>

</style>
직접 한거라 특이사항 x